Tuesday, February 5, 2013

An Intro to Hardware Hacking for CS folk: Part 3, Digital I/O

The previous post discussed how the process works to get some code running on a microcontroller. This post ought to be a bit more productive, as it will discuss how to actually do some stuff with that code. All microcontroller software has something to do with input and output (I/O), so let's first discuss what digital I/O is.

What constitutes I/O?

Since we are working with electronic devices, I/O is all about the flow of electrons. When we discuss that in the context of circuits, there are two quantities at play: voltage and current. Physics class tells us that voltage describes the potential energy of the moving electrons, and current describes their quantity. In hardware hacking, voltage is how we measure a signal, and current is what lets us know when things may or may not blow up :) The reason for this distinction is that the digital devices we work with, like microcontrollers, are built out of transistors. Transistors on the most basic terms are voltage-controlled switches (some gifs to get the point across),  so it is much easier for such devices to make decisions based off the voltage of an incoming signal. Since a switch is either closed or open, on or off, we can refer to binary or digital I/O as signals that have only two voltage states, each either leading to a switch closing or opening. Since voltage, like all potential energy, is measured as a difference between a high value and a low value, we should make things easy and force all of our signals to be at the same high and low values. The low value is called ground, and the high value is called Vcc.

The microcontroller itself requires a supply of current and a voltage drop across it to function. For the Arduino, this is supplied to us over USB. USB has a 5V drop (Vcc = 5V), and the Arduino exposes this current source through some pins. Here they are:

Arduino Pinout image, source http://arduino.cc/en/Reference/Board
Arduino Pinout, source
The 5V Vcc and ground reference pins are at the bottom of the pinout diagram. At the top in green are the digital I/O pins. These pins have two modes (have a guess, one starts with I and the other with O). In the input mode a transistor switches on or off to indicate the voltage drop across the pin, and that state is exposed to software. In output mode, we can use transistors to make the pin either a current source (high voltage = Vcc) or a current sink (pin connected to ground). Let's see how we can manipulate these pins with software.

Memory-Mapped I/O

Microcontrollers strive to be uncomplicated devices. I/O presents an interesting challenge in how to easily present it to the C programmer. A convenient way is to use existing paradigms. Since all programs read and write memory, why don't we extend that concept to the I/O pins? A portion of the address space is mapped to the control of the I/O pins. We can write to these bytes (called registers) as if they were memory, but behind the scenes the address and data lines are routed straight to circuits controlling the pins. That's the beauty of memory-mapped I/O.

Example Time


Alright already! Let's finally see this memory-mapped I/O work in a program to make an LED (light-emitting diode) blink. First, we need a circuit. Let's hook up an LED to pin 13 on the Arduino. Here's an image showing this:

Arduino Blink circuit, image from http://arduino.cc/en/Tutorial/blink
Arduino Blink Circuit image, source
More professionally, we draw circuits as a schematic, like below:

Arduino Blink Circuit schematic, image from http://arduino.cc/en/Tutorial/blink
Arduino Blink Circuit schematic, source
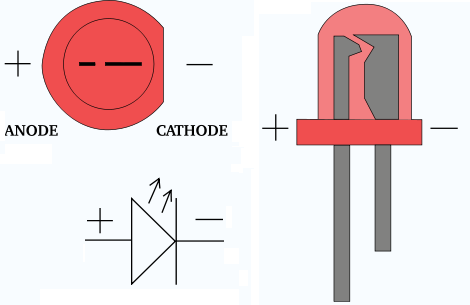
If we trace the circuit, we see that there is a direct connection to the Arduino ground pin, indicating that it must be the current sink. Therefore, we must be using digital pin 13 (D13) as the current source. Another point that enforces this is that LEDs only work in one direction, i.e. one particular leg (the longer one) must have a higher potential than the other. The schematic shows this with the LED symbol, which kinda looks like an arrow. The second important piece to notice is the resistor. Without it, the current would be too high, and as was stated before, stuff would blow up (although in this case, there sadly won't be explosions; the LED will just get really hot and then fizzle out). How do we know what resistor value to use? The datasheet. If you bought LEDs from Sparkfun, their product page you would have gone to links to an all-knowing document called the datasheet that gives (ideally, sadly not always reality) all public knowledge about the product. Think of it as the API for the hardware at hand. This document tells us that the LED requires a forward voltage of 1.8-2.2V (it's a diode, so it needs that minimum voltage for the electrons to move across the junction) and a maximum sustainable forward current of 20mA. We need some resistor to make sure that current limit is not broken. Since there are no branches, the current through the resistor is the same as through the LED, so we can use Ohm's Law 
(V = IR). The voltage drop across the resistor is 5-1.8V at maximum = 3.2V, the current max is 20mA, leaving Rmin = 160Ω. The 220Ω resistor will do just nicely then.

Now that the circuit is ready, we can run the code. Without further ado, here it is:


/*
  Blink
  Turns on an LED on for one second, then off for one second, repeatedly.
 
  This example code is in the public domain.
 */
 
// Pin 13 has an LED connected on most Arduino boards.
// give it a name:
int led = 13;

// the setup routine runs once when you press reset:
void setup() {                
  // initialize the digital pin as an output.
  pinMode(led, OUTPUT);     
}

// the loop routine runs over and over again forever:
void loop() {
  digitalWrite(led, HIGH);   // turn the LED on (HIGH is the voltage level)
  delay(1000);               // wait for a second
  digitalWrite(led, LOW);    // turn the LED off by making the voltage LOW
  delay(1000);               // wait for a second
}

We've discussed almost all of the concepts in this program. The setup() routine initializes our digital I/O pin as an output pin, so we can make it a voltage source. The loop() routine continuously oscillates the voltage between Vcc and gnd to turn the LED on and off. The only part we've missed is the delay(), but that will be saved for another post.

For better or worse though, the Arduino libraries abstract away much of the I/O concepts under the hood. To see the memory-mapped I/O in action, we need to see the source of the Arduino libraries. Thankfully, they're open. We can see the guts of pinMode() and digitalWrite() in wiring_digital.c, and like most professional C program guts, it isn't the prettiest. Arduino uses a few abstraction layers to hide the actual memory address of the registers. One is the concept of the "pin #." The Arduino software uses tables stored in code memory to map the pin # (in our case, 13) to a port (an I/O pin group) and a pin on the ATmega microcontroller. We can see these actual ports and pins in the microcontroller datasheet, or in Arduino's handy mapping image. Pin #13 is actually pin PB5, a general-purpose I/O pin (commonly referred to as GPIO) resident on Port B. What pinMode() really does then is write a 1 to the bit 6 in the data direction register DDRB through the address 0x24 (see page 426) to make PB5 an output pin. The function digitalWrite() then writes either a 1 or 0 accordingly to bit 6 of the data register PORTB through the address 0x25 to set the voltage on the pin. The Arduino abstraction layers are wonderfully nice at hiding all of this. If you ever use another microcontroller platform though, or run into some performance troubles, remember that the I/O registers are always there for you.

Wrap-up

"Blink" is only the beginnings of working with digital I/O, but it is one of the best foundations. From here, can you write a program that only blinks when a switch or button across another I/O pin is hit? Or hook up a buzzer to an output pin and toggle fast enough to output a song? I'll admit I've done a horrific rendition of "I Believe I Can Fly" this way. There are many other facets of I/O to cover, such as communications protocols, analog signals, clocked signals, and interrupt techniques, and I hope this has been a good start so far.

Monday, January 28, 2013

An Intro to Hardware Hacking for CS folk: Part 2, How the code works

(N.B. This post tends to be a bit more about how things work instead of how to use them. For Arduino/microcontroller quick starts, see Instructables or Adafruit)

The last post (a really long time ago) talked about what a microcontroller was and its purpose. This post aims to take the next step of introducing how software development works for these devices. I'll begin with what any proper CS blog post should, a language discussion.

What language do I use?


Microcontroller programming is typically done in C or C++, and assembly is not uncommon. There are a few reasons why these lower level languages are de rigeur:
  • Resource consumption - Going back to the previous post on microcontroller specs, a few KB of program memory does not allow for managed runtimes. Usually the only code on the chip are the routines that the programmer developed or explicitly linked against (I say usually because operating systems and bootloaders for microcontrollers do exist, and perhaps I'll discuss them later). Even if the program memory did exist, microcontrollers typically do not have the cycles to spare for garbage collection or handling unchecked runtime exceptions. The goal is to have just enough code to do the job. As microcontrollers gain more hardware resources, the use of languages like C++ grows as the overhead of object-oriented programming can be mitigated by increased developer productivity.
  • Determinism - Microcontrollers are often used in mission critical situations. Couple that with the hardware resource constraints mentioned above, and embedded systems developers become wary of every cycle spent in a routine. Many often used functions are written in assembly to ensure any time or space constraints are met, and that they are met consistently.
  • Portability - While in the PC world software is almost exclusively written for x86, and in the mobile world software is almost exclusively written for ARM, in the embedded devices landscape there are numerous ISAs (AVR, ARM Thumb, m68k, Renesas RX, PIC, TI MSP430, and many many more). Chances are there is a C/C++ compiler available to help keep your software ISA-agnostic.
  • Toolchain - C and C++ undoubtedly have some of the most mature software toolchains. This is especially important for embedded software, where compiler optimizations are a necessary tool for reducing code size but cannot endanger software correctness. On the latter note, there are also many lint tools available for C.
Now that we have some basis for why the code is in asm/C/C++, let's start looking into the actual code itself.

What does the code look like?


At the minimum, it is something like this:

void main()
{
    while( 1 );
}

To readers that are used to writing scripts or non-REPL shell applications, the mandatory infinite loop seems a bit weird. The reason for its existence is simple: there's no other code to execute other than your own. If there wasn't an infinite loop, the program counter would just keep stepping through some undefined or zeroed-out code memory until it hits something ugly (like interrupt vectors, but that's another post down the road). Regardless, more than likely the job of your microcontroller program will be to constantly respond to input. Typically then we can segment the code into two parts: one for setting up the hardware for receiving that sensory input, and the other the loop to continuously process and act on it. Conveniently, the Arduino framework separates this out for us. Here's what a blank Arduino sketch (fancy word for program) would look like:

//// Copied from the Arduino BareMinimum Example

void setup() {
  // put your setup code here, to run once:

}

void loop() {
  // put your main code here, to run repeatedly: 
  
}

As a teaser, here's an example program showing how those functions could be filled out:

//// Copied from the Arduino DigitalReadSerial Example

/*
  DigitalReadSerial
 Reads a digital input on pin 2, prints the result to the serial monitor 
 
 This example code is in the public domain.
 */

// digital pin 2 has a pushbutton attached to it. Give it a name:
int pushButton = 2;

// the setup routine runs once when you press reset:
void setup() {
  // initialize serial communication at 9600 bits per second:
  Serial.begin(9600);
  // make the pushbutton's pin an input:
  pinMode(pushButton, INPUT);
}

// the loop routine runs over and over again forever:
void loop() {
  // read the input pin:
  int buttonState = digitalRead(pushButton);
  // print out the state of the button:
  Serial.println(buttonState);
  delay(1);        // delay in between reads for stability
}

There is a lot left to cover though to explain how that program works. One last piece I want to explain in this post is how does the microcontroller load the program in the first place.

Where does the code go?


On a general purpose computer, executing a program is rather complicated. The program has to be loaded from disk, its address space allocated, and its code and globals copied into memory. Since the microcontroller is generally a single purpose device, we don't have to worry about resource allocation. Our principal concern is how to get a binary we compiled on a PC to executing on a microcontroller. Our analogue to a disk is the EEPROM, and to get the code there we need a programmer.

The EEPROM, also called Flash memory since it uses the same floating-gate transistor technology as your SSD or your smartphone storage, is programmable read-only memory that can be erased electrically (ta-da!). In the case of the Arduino Uno, the Atmel AVR ATmega328P microcontroller onboard has 32KB of Flash memory (Atmel distinguishes Flash as the program storage area, and EEPROM as a smaller buffer for the programmer to store non-volatile variables, but the underlying technology should be the same and I'll use the terms interchangeably in this post). 32KB is a surprisingly large amount of space when you have the only program; enough for even autopilot software with GPS support. Since it is non-volatile, cutting the power to the microcontroller will not erase the program. The Flash memory on the ATmega328P is good for 10,000 writes, so feel free to keep "flashing."

To actually write to the EEPROM, a programmer is typically required. This procedure can get complicated, since we have to transfer a binary file from a PC with typically only USB as I/O to an EEPROM using its write commands. If we just had an AVR microcontroller we would have to buy a programmer (an AVR-ISP in this case, since it would use AVR's in-system programming protocol). Luckily, the combination of the Arduino board and software simplifies this process through their bootloader. The Arduino bootloader is a small program permanently resident in EEPROM that runs on microcontroller reset. It receives data from the PC through the Arduino IDE (and through a USB to serial chip, will discuss later), writes it to the EEPROM, and then starts the written program. The mbed microcontroller also has a similar mechanism, and cleverly exposes itself as a USB Mass Storage Device so that you can drag-n-drop the program binary onto the device. Once the EEPROM is loaded, execution starts, and continues ad infinitum (unless you forgot that infinite loop!)

Where do we go from here?


So far this post has been about code, but not what to code. The next post will be about I/O, which will be the basis for all interactions with the microcontroller. Any feedback in the meanwhile is definitely appreciated!

Thursday, May 31, 2012

Ed: OpenCL vs CUDA, Mid-2012 Edition

It has been a year to the day since I wrote about choosing between CUDA and OpenCL for GPU-accelerated applications. A lot has changed in the GPU compute industry since then, so I thought the topic was worth a revisit. This time, I'll make it more of a shootout and split up the discussion into some points worth considering in this debate, namely scalability, friendliness, and compatibility.

Wednesday, September 21, 2011

An Intro to Hardware Hacking for CS folk: Part 1, What's a microcontroller?

N.B. You can find a prelude to this post here.

Microcontrollers are everywhere. They engage the brakes in your car, open the doors of your building's elevator, and yes, cook the frozen dinner in your microwave.  But what are they, and how can you, the budding hardware hacker, take advantage of them? Hopefully this post will serve as an introduction to the most popular computing devices around.

An Intro to Hardware Hacking for CS folk. A Prelude with µWave

I'd like to start off this post with a big thanks to the PennApps team. They put together a fantastic hackathon last weekend, with 40 teams developing crazy apps in only 48 hours. I was fortunate to be a part of one of those teams, and we worked on a project called µWave. µWave is a microwave (how punny is that name) that we hacked to figure out how long you are cooking food and to transmit that data over HTTP. A server then uses that information to find a YouTube video of suitable length to play for you while you wait, and to @mention you in a tweet and text you when that food is ready. I am happy to report that this project won the competition, which is especially cool since it was the only hardware hack around. While we µWave creators are a team of electrical engineers (except for me the computer engineering student), I refuse to believe that you need a EE degree to tinker with electronics and devices. The next post will introduce microcontrollers, the bridge between hardware and software development. In a later post, we can discuss how to work with analog and digital signals to interact with different devices.

TL;DR prelude: CS people can (and should) hack hardware too. Let's talk about it.

Monday, June 20, 2011

Intel MIC/Larrabee is Coming!

(Note: in this post, like many others, I unfortunately don't give too much background info. If you would like to learn more about Larrabee the Intel MIC, you are welcome to check out the slides and video lecture I gave on the subject here. Larrabee architect Tom Forsyth also links to a wealth of sources on Larrabee at his home page).

Intel Vice President Kirk Skaugen presented the Intel Many Integrated Core (MIC) platform at the International Supercomputing Conference (ISC) today. He unveiled the platform at the same event last year, showcasing then the Knights Ferry development kit and announcing the Knights Corner product. While I don't see it in the presentation slides, news sites are reporting that Knights Corner products will be available (or go into production?) next year. Kirk's slides at least confirm that Knights Corner will be a > 50 core part built with Intel's new 22nm tri-gate process.

The presentation at ISC 2011 also showed a variety of benchmarks from different research centers using the Knights Ferry development board. The GFLOPS numbers for the year-old Knights Ferry don't look too impressive to me; you can get 2 TFLOP SGEMM performance out of an AMD Radeon HD 5870 (released in 2009), for instance. However, we must keep in mind that those 2 TFLOPs came out of writing the routine entirely in AMD intermediate language (IL), which is 5-wide VLIW assembly. Larrabee's true importance is in its ease of use. Take a look at the second page of this PDF to see how simple it can be to write parallel code for Larrabee. One could even argue that it's nicer than Microsoft's unreleased C++ AMP.

2012 is not yet here though, and time is of the essence in the extremely fast-moving GPU world. NVIDIA is preparing Fermi's successor, and AMD's Graphics Core Next is also around the corner (I hope to write a post on that soon). The semiconductor industry knows to never underestimate Intel, though, and with 50 Larrabee cores, the advantages of the tri-gate process, and the might of Intel's software development tools, Knights Corner has the potential to shake up the GPU compute industry.

Thursday, June 16, 2011

Microsoft's C++ AMP (Accelerated Massive Parallelism)

Microsoft has just announced a new parallel programming technology called C++ AMP (which stands for Accelerated Massive Parallelism). It was unveiled in a keynote by Herb Sutter at AMD's Fusion Developer Summit 11. Video and slides from the keynote are available on MSDN Channel 9 here (Herb begins talking about C++ AMP around a half hour into the keynote).

The purpose of C++ AMP is to tackle the problem of heterogeneous computing. Herb argues for a single programming platform that can account for the differences in processing ability and memory models of CPUs, GPUs, and Infrastructure-as-a-Service (IaaS) cloud platforms. By basing it off of C++ 0x, such a platform could provide the abstractions necessary for productivity, but also allow the best performance and hand-tuning ability. Let's dive straight into the code with an example given during Herb's keynote:

void MatrixMult( float* C, const vector<float>& A, const vector<float>& B,
int M, int N, int W )
{
	array_view<const float,2> a(M,W,A), b(W,N,B);
	array_view<writeonly<float>,2> c(M,N,C);
	parallel_for_each( c.grid, [=](index<2> idx) restrict(direct3d) {
		float sum = 0;
		for(int i = 0; i < a.x; i++)
			sum += a(idx.y, i) * b(i, idx.x);
		c[idx] = sum;
	} );
}


This is a function that performs floating-point matrix multiplication. I'll try a bottom-up approach and go line by line to see what's new with C++ AMP. There is certainly nothing different from regular C++ in the function argument list (Disclaimer: my knowledge of C++ is minimal; school has caused me to stick with C). The next few lines, though, introduce a class called an array_view. Herb described it in the keynote as an iterable array abstraction. We need this abstraction because we have no idea about the underlying memory model for the system our code is executing on. For example, if we are developing for an x86-64 CPU, then we have one coherent 64-bit address space. But if we are using a discrete GPU, then that GPU may have its own completely different address space(s). With IaaS platforms, we may be dealing with incoherent memory as well. The array_view will perform any memory copies or synchronization actions for us, so that our code is cleaner and can run on multiple platforms.

Next up is the parallel_for_each loop. This is surprisingly not a language extension by Microsoft, but just a function. Microsoft's engineers determined that by using lambda functions (a new feature of C++ 0x) as objects to define their compute kernels, they can avoid extending C++ to include all sorts of data-parallel for loops. In this case, a lambda function is executed that calculates the dot product of a row of a and a column of b over the grid defined by the output array_view c. It seems that the lambda function takes a 2D iterator as an argument to traverse the arrays.

There is one keyword that I didn't explain, which is restrict. Herb says in the keynote that this is the only extension they had to make to C++ 0x to realize C++ AMP. restrict provides a compile-time check to ensure that code can execute on platforms of different compute capability. For instance, restrict(direct3d) ensures that the defined function will not attempt to execute any code that a DirectX 11-class GPU could not execute (such as throwing an exception or using function pointers). With this keyword, C++ AMP can have one body of code that runs on multiple platforms despite varying processor designs.

The ideas presented in this example itself make me excited about this platform. We only have to write whatever data-parallel code we need and the runtime can take care of the details for us. This was the promise of OpenCL, but C++ AMP does take the concept further. There is no new language subset to account for the threading and memory models of GPUs. There is no need to worry about which compute node's memory space the data is at. It also seems from this example that there is no need to size our workload for different thread and block counts like in CUDA; the runtime will handle that too. Microsoft showed an impressive demo of an n-body collision simulation program that could run off one core of a CPU, the on-die GPU of Fusion APUs, discrete GPUs, or even a discrete GPU and Fusion GPU at the same time, all using one executable. They simply changed an option from a GUI dropdown list to choose the compute resource to use.

There are plenty of details left to be answered, though. While Herb said in the keynote that developers will be free to performance tune, we don't know how much we can control execution resources like thread blocks. We also don't know what else is available in the C++ AMP API. Additionally, while Microsoft promises C++ AMP will be an open specification, the dependence on DirectCompute questions the notion of quality implementations on non-Windows platforms. Hopefully the hands-on session given at the Fusion summit by Daniel Moth will be posted online soon, and we can see what details were uncovered then.

The announcement by Soma Somasegar notes that C++ AMP is expected to be part of the next Visual C++ and Visual Studio release. Herb announced in the keynote that AMD will release a compiler supporting C++ AMP for both Windows and, interestingly, non-Windows platforms. NVIDIA also announced their support, while noting that CUDA and thrust is still the way to go ;). With the support of the discrete GPU vendors (note: nothing from Intel yet...) and the most popular development environment, C++ AMP has the potential to bring heterogeneous computing to a much larger developer market than what CUDA or OpenCL can do in their current form. I won't underestimate the ability of CUDA or OpenCL to catch up in ease-of-use by its release, though. In any case, I look forward to simpler GPU computing times ahead.